DRS or the Disaster Recovery System is a backup and restore feature of Cisco Unified Communications Manager, Unified Presence, Unity Connection, and it gives us a nice graphical user interface where we can schedule a backup, do a manual backup, monitor the status of a backup. These backups can either be stored on a tape drive or my personal preference is a secure FTP server.
Something to keep in mind about these backups though, these backups are not intended for migration. If you’re upgrading from one version of let’s say Communications Manager to another version and you think you’ll make a backup before you upgrade and then you’ll restore from that backup, that’s probably not going to work because DRS requires that the version of software running on the server match between the server that you backed up from and the server that you’re going to restore to. So it’s really meant for disaster recovery rather than migration.
DRS Architecture
DRS has a couple of subsystems that make it work. There is a Master Agent and a Local Agent. The Master Agent does things such as maintaining an XML file, which contains all of the scheduled tasks. And the administrator when they’re using DRS they’re accessing the Master Agent when they are doing things like configuring a backup device. That’s the Master Agent that takes care of that.
The Local Agent however runs the scripts on the server to actually perform the backup and restore processes.
DRS Menu
How do we access the Disaster Recovery System? Well, first understand that DRS can act as our Disaster Recovery System for Cisco Unified Communications Manager, Unified Presence, Unity Connection. The way we access the interface is to point to the server, it’s an HTTPS connection, we point to the server by name or IP address and say /drf.
DRS System Components
DRS can backup Platform, Trace, Syslog and License information on all of the different platforms that it can backup for. But the individual platforms might vary a little bit as to what is getting backed up and what can be restored.
| Cisco Unified Communications Manager | Cisco Unified Presence | Cisco Unity Connection |
|---|---|---|
| Platform | Platform | Platform |
| Cisco License Manager | Cisco License Manager | Cisco License Manager |
| Trace Collection Tool | Trace Collection Tool | Trace Collection Tool |
| Syslog | Syslog | Syslog |
| Cisco Unified CM DB | Cisco Unified Presence DB | Cisco Unified Connection DB |
| TFTP / MOH Files | XCR Data | Mailbox Store |
| CDR / CAR Data | CUP Data | Greetings |
The table above gives us a real-world reference for what can be backed up on these different platforms.
Backup Devices
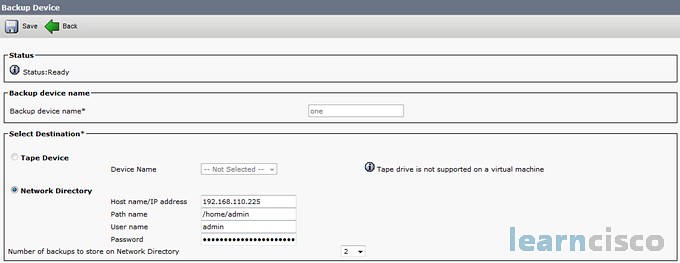
Before we can perform a backup we first have to configure the backup device. To what are we backing up? Is it a tape drive, is it an external secure FTP server? Well to set this up in the Disaster Recovery System interface we go under the Backup menu and select the Backup Device. By the way, we can configure as many as 10 different backup devices. Personal preference I like to use the secure FTP server but if you prefer you could certainly use a backup tape.

On the image above we see how we could back this up to a secure FTP server. We select Network Directory and by the way we do have to give a name for this backup device because we can have more than one. We give it a name, we click the radio button that says perhaps Network Directory or Tape Device. But I typically say Network Directory. You give the Server name if DNS services are being used, you might use the DNS name, I always use the IP address. You can then put the Path name on that secure FTP server is it going to be in the root of the server or is it going to be in a specific subdirectory of that FTP server, you can specify that. And then you give your login credentials for the secure FTP server, what is the User name, what is the Password. We can set a limit as to the number of backups that can be stored on a network directory. You can have as many as 10, the default is two.
Scheduler
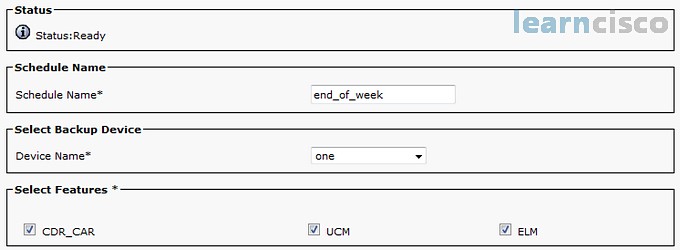
Once we have our backup device to find, we might want to schedule regular backups. We could go into the Backup menu again and select Scheduler this time and we can create as many as 10 schedules. We give the schedule a name. We say what’s the device that we’ve already configured. We’ve already defined as many as 10 devices, maybe a tape drive, maybe a secure FTP location, but we select our destination backup device. And then say what exactly are we backing up.

On screen we’re saying we want to backup the CDR_CAR records, as well as CUCM. The options that you have can vary depending on what you’re backing up. For example for Cisco Unity Connection your options might be Connection Database, Connection Greetings Voice Names, Connection Messages, Unity Mailbox Database 1 or CUC. For Unified Presence it might be CUPs or CUP.
When we’re scheduling a backup after we say what’s the device we’re backing up to and what components of the database on this platform are we backing up, then we can specify the frequency of those backups. Do we want to do it just once, do we want to do it daily, do we want to do it weekly? And we can specify date and time information, and day of the week information of when we want to run this backup. When you’re done you click on Save and then this scheduled backup appears in the Schedule List area. And from that schedule list area you can then click on Enable Selected Schedules to activate that schedule, you put a checkmark next to it and you click on Enable Selected Schedules.
In addition to scheduling a backup we could alternately or in addition to a schedule backup have a manual backup. Again we go in to the Backup menu and we select Manual Backup this time, we select our Device Name that we’ve already configured and we say for this particular platform what are we backing up. When we’re done we click on Start Backup.
We can look at the current status of a backup that we have manually started or scheduled by going under Backup and selecting Current Status. And if a backup has already completed, the result is SUCCESS for our first backup. If we want to see a Log File for a backup that has already happened whether it was successful or not, we can click that hyperlink to open up the log file.
Restore Wizard
Now that we’ve seen how to backup data using the Disaster Recovery System, let’s think about how we can restore data. Well, Cisco gives us a Restore Wizard. We go under the Restore menu in the Disaster Recovery System interface, and we select Restore Wizard, we select the device name that contains the backup, we click on Next, that’s why we call it a wizard we’re clicking next and we’re clicking next again. And after we select the Device Name for our backup device and click Next, we select this specific backup file, which has a date and timestamp to help us pick the appropriate Backup File, and then we click Next again.
Continuing with our Restore Wizard we can select which features we want to restore. Maybe we put a checkmark next to UCM for Cisco Unified Communications Manager, we click Next again and we can say whether or not we want to perform an Integrity Check on that file. We select the server that we want to restore to and then we click on the Restore button.
Just as we could get status information about our backup processes, we would also get status information about our restore processes. The Restore Status screen is telling us about the restore processes. There’s a hyperlink again to the log file where we can read more about that.
If we would like to get a history of our backup processes or our restore processes performed by the Disaster Recovery System, we can do that under the Backup menu in the Disaster Recovery System administrative interface. We can select History to get a history of backups or under the Restore menu we could click History to get a history of restore processes.
Our Recommended Premium CCNA Training Resources
These are the best CCNA training resources online:
Click Here to get the Cisco CCNA Gold Bootcamp, the most comprehensive and highest rated CCNA course online with a 4.8 star rating from over 30,000 public reviews. I recommend this as your primary study source to learn all the topics on the exam.

Want to take your practice tests to the next level? AlphaPreps purpose-built Cisco test engine has the largest question bank, adaptive questions, and advanced reporting which tells you exactly when you are ready to pass the real exam. Click here for your free trial.
