Auto-registration
Auto-registration is one of our options for adding phones, this is where we get the random directory numbers. Well, basically we get to set the range, so let’s say we want to hand out directory number 1000 through 1999, we can say that, we just don’t have the ability to specify which phones are going to get which number within that range. Existing endpoints are not affected. Once autoregistration is done whatever that phone has been configured with, it’s a done deal. In other words, if we reboot the phone it doesn’t go through the autoregistration process again. On your Communications Manager, again we could use BAT afterwards to make the bulk changes to these phones if we needed to. And then finally, we could use the Communications Manager auto-register phone tool. This could be used to associate phones with a specific directory number after autoregistration, but remember that CRS solution also has to be part of this, so there is a little more configuration that needs to take place.
Configuring Auto-registration
To set up autoregistration we need to decide which protocol we’re rolling out for our phones. Is it Skinny or is it SIP? Choose that. We want to make sure that autoregistration is enabled on one of the Communications Manager servers in a group, and within that group we need to enable or disable autoregistration. We need to make one server the deliverer of the directory numbers. So, we go in and we say this is going to be server doing autoregistration and this is the range of directory numbers that are going to be assigned. And again after that we can use BAT to change or modify anything that happened during that autoregistration process that we might need to change.
As we said, to start we need to set what that default protocol is we’re using. So this is our Enterprise Parameters that we are going to go into and we are going to change or look at whether or not we are going to use Skinny or SIP.
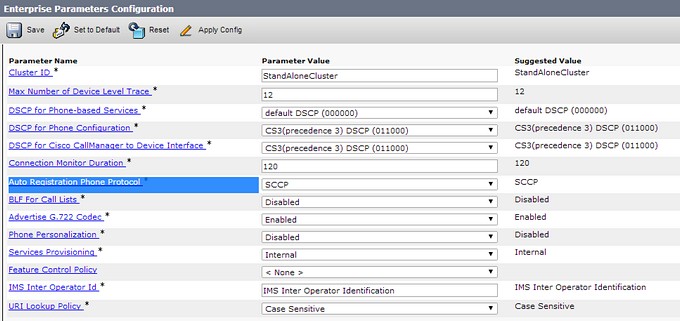
Skinny is the default, so if that’s which you are going to be using no need to change the Enterprise Parameter, but if you do need to change it to SIP then go ahead and save and now we have protocol selected.
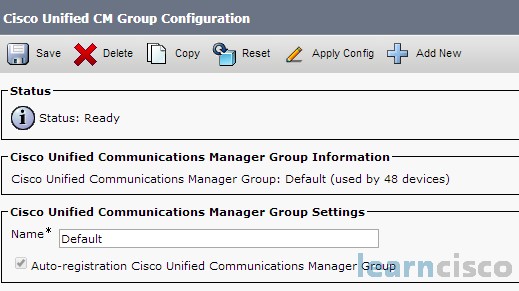
Next we’re setting up the Communications Manager groups. So we go in, we select the communication managers for that group, of course it’s an ordered list so the primary server is the first server in the list and then we need to check autoregistration for the group.
Finally, we specify the range of directory numbers that we’re going to be handing out. So we pick that starting and ending range, and then something that’s almost counterintuitive, we need to make sure that the checkbox is cleared for the auto-registration disabled on the Cisco Communications Manager server.
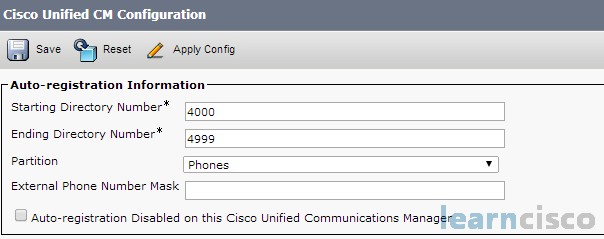
Notice how it’s worded, so if the checkbox is there it means it’s disabled, we’re not using the numbers that are listed here for auto-registration and this server is not participating. When we remove the checkbox then we are using this server for auto-registration.
Manual Cisco IP Phone Configuration
Now let’s look at manually adding an IP phone. I’m not saying you’re never going to do this, a lot of times you might just have to add one or two phones. So you’ll walk up to your Communications Manager graphical user interface and add a phone. After adding the phone, configure the phone settings, add a directory number to that phone, and then apply that configuration.
To manually add a phone we go to Device -> Phone and then we have an option to select the Phone Type we’re going to be adding. We’ll choose that and we will choose the Phone Protocol and next we are going to move into Configuring the Phone Settings.
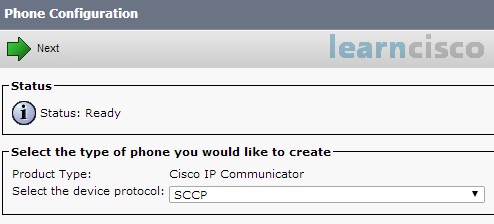
From the phone settings page we now have to put in the MAC Address, a Device Security Profile, the Device Pool, which hopefully we’ve already configured. We can put in the Phone Button Template, the Common Phone Profile for the firmware, the locale, which is the language, and then we also have the Built-in Bridge capabilities, Privacy capabilities and the Device Mobility Modes that we can set up – there’s a lot of parameters in here.
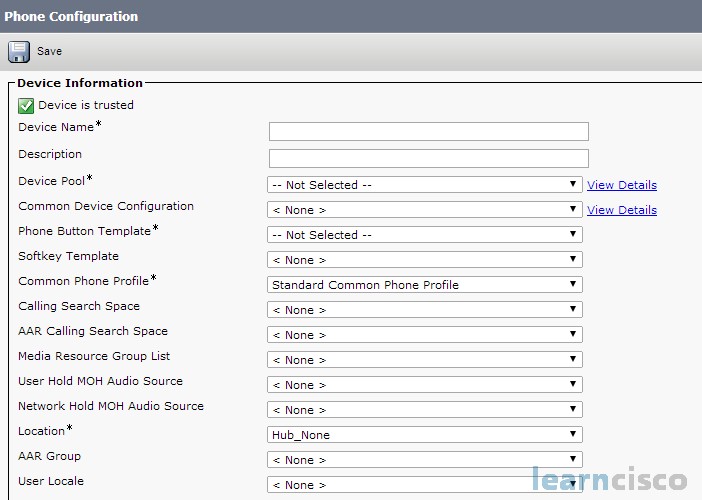
You have to supply information for any parameter that has an asterisk after it (*). That is the key here. If you attempted to save your phone configuration settings and you did not put in an entry for something that had a star next to it, you’re going to get prompted, you know you can’t save it yet you didn’t finish configuring this phone and you’ll need to go in and supply that information.
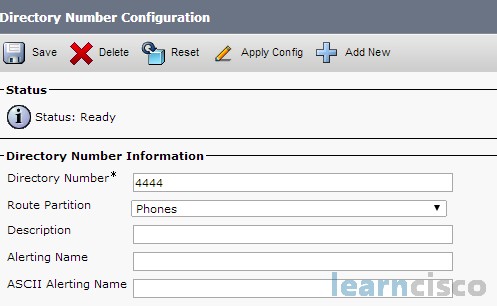
Once we get the base information in, now we need to go into the individual directory numbers and add those. So we’ll open up the directory configuration page from that main phone page and then we’ll start to type in the directory number. And this can allow us to put in things like presence groups, auto answer, visual message waiting indicator policies, the ringing, the maximum number of calls and the busy trigger. So we’ve a lot of options here as well, for when we configure that directory number, how we want it to behave.
When we’re all done, we are going to say Apply Configuration. This will apply the changes and at this point, most times the IP phone is going to need to restart to apply these configuration changes, the reason why we saved it, TFTP file needs to be redownloaded with all the new changes so the phone is made aware of all the new options that you put into it.
Our Recommended Premium CCNA Training Resources
These are the best CCNA training resources online:
Click Here to get the Cisco CCNA Gold Bootcamp, the most comprehensive and highest rated CCNA course online with a 4.8 star rating from over 30,000 public reviews. I recommend this as your primary study source to learn all the topics on the exam.

Want to take your practice tests to the next level? AlphaPreps purpose-built Cisco test engine has the largest question bank, adaptive questions, and advanced reporting which tells you exactly when you are ready to pass the real exam. Click here for your free trial.
