We are finally ready to configure an Ethernet switch, and in this lesson we will do just using Cisco IOS software. So we will describe its features and functions as well as its command-line interface. Highlights include the startup of an EXEC session and the use of key features like the online help, enhanced editing, and command history functions.
Cisco IOS Software
IOS is the operating system and embedded software architecture of all Cisco devices; in fact, the acronym stands for internetwork operating system. It allows the device not only to have a command-line interface for configuration but also it is the software that defines the features and functionality along with protocols that will be supported by the device.
In switches, this includes the intelligence to provide Ethernet connectivity and manipulate Ethernet frames on Ethernet ports. It also includes security functions to control acces and prohibit unauthorized network use, scalability features, reliability features, and others. IOS is the operating system of Cisco catalyst switches.
Configuring Network Devices
The IOS command-line interface allows you to configure the switch; however, initial default settings are sufficient for the switch to operate at layer 2 as a switch. In other words, ports are enabled by default and the switching function starts working as soon as the device boots up. If you connect devices to the switch, then Ethernet is ready and the switching function is ready. Layer 3 functionality would still need to be configured as a way to automate this configuration and hide the complexity of commands from administrators. Cisco devices will prompt for initial configuration if there is no configuration in memory. So when they boot up, if the configuration files are empty, then a process called setup will start.
This process can also be evoked with a specific command after the switch has booted up. The Setup dialog box includes questions related to additional configuration tasks to set up the device including protocol addressing and parameter settings at layer 3 including IP address and subnet mask. Other options for administration and management include password setting and the definition of management protocols.
An Overview of Cisco Device Startup
So, Cisco devices check for configuration files when they are booting up; that is not the only thing they do. They will first find and check the device hardware and run a series of diagnostic tests known as power-on self-test or POST. After the hardware has been shown to be in working order, the switch will start a series of initialization steps including loading the IOS software image. This will enable the operating system and allow for configuration using the command-line interface. Last but not least, the device is ready to load up the current configurations and so it will try to find a configuration file that is valid and has a right format and load it up in memory to give the device its initial config. The location of the IOS software image and device configurations are well set; however, there are fallback options just in case they are not there, they have been corrupted, or they have moved to a different location. The fallback options are automatic and are part of the booting process.
External Configuration Sources

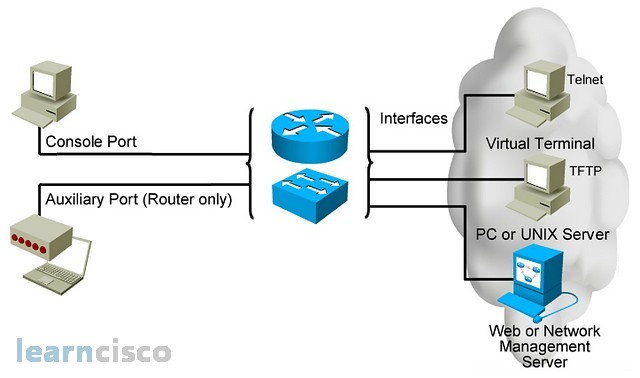
At this point, you are ready to configure the device. Configurations can come from many sources and they will act in device memory. In other words as soon as I type a command or load up a configuration file, that configuration will be present and active in memory. There are multiple ways to access the device for configuration and management purposes. The first one is the console port, which is included in most Cisco devices and it is a serial port that allows for low bandwidth connectivity in order to reach the command-line interface and start configuring.
A similar port is the auxiliary port that will provide access to the CLI, but it only exists on routers and it allows a modem type connection for out-of-band management. Other than that, you can reach the device in band using the network, you can use the current active interfaces of the device to connect to it via a virtual terminal like Telnet clients or download files via TFTP, and more recently, with other protocols like FTP and secure copy or configure, monitor and manage the device via a central network management server or network management tool typically via SNMP, in the case of Cisco, an example could be Cisco Works.
IOS includes a configuration shell known as the command-line interface. This can be used to either enter or paste commands to configure the device. There may be multiple flavors of IOS depending on the type of device including firewalls, wireless access points, switches, routers, etc. Commands are laid out and become available in multiple command modes that follow a hierarchical approach. For example, you will go into global configuration mode to configure things that are common to the router as a device, but you can also go from there going to interface configuration mode and configure specific interfaces. Each mode has a distinctive prompt for easy visual recognition.
When typing commands, you can press the Enter key and this will parse and execute the command live. Those commands go into RAM and into what is known as running configuration. They would have to be saved into what is known as the startup configuration for them to be available in the next router bootup. An example of a configuration mode is the EXEC mode. The EXEC mode allows users to open a shell into the device and start configuring. There is role-based access control in these Cisco devices as the exact mode has two different sub-modes, user mode and privilege mode. In user mode, the administrator can only monitor and verify the configuration and use diagnostics tools to monitor the network and the device itself. In privilege mode, you will have more administrative power in terms of maintenance of software and components of the device plus the capability to configure the device.
Cisco IOS Software EXEC Mode (User)
Again, the user mode is the first mode you find when connecting to the device. You will have limited monitoring capabilities of the device and no configuration capabilities. You can identify the user mode by looking at the command prompt. It will have the device name followed by a greater than sign. In this mode, you can start using the online help available at IOS CLI; simply by typing the question mark, you can get information on the available commands in this mode.
DSTR2 con0 is now available
Press RETURN to get started.
User Access Verification
Username: admin
Password:DSTR2>?
Exec commands:
access-enable Create a temporary Access-List entry
access-profile Apply user-profile to interface
clear Reset functions
connect Open a terminal connection
…
Cisco IOS Software EXEC Mode (Privileged)
The second mode is the privilege mode. It allows not only monitoring and diagnostic capabilities but also maintenance and configuration capabilities. It is a building block to other configuration modes, and you can recognize that you are in privilege mode if the prompt has a host name or device name followed by a pound sign. In order to go from user mode into privilege mode, you would need to type the command enable and you may be asked and prompted for a user name and password or simply a password to enter such administrator mode.
DSTR2>
DSTR2>enable
Password:
DSTR2#
DSTR2#?
Exec commands:
access-enable Create a temporary Access-List entry
access-profile Apply user-profile to interface
access-template Create a temporary Access-List entry
…
Switch Command-Line Help Facilities
The command-line help on Cisco devices is highly comprehensive. You will have a context-sensitive help, which allows you to list the available commands in each configuration mode and it also helps you build the syntax of the commands by typing the question mark for each step or each parameter of the command itself.
You also have the capability to move up and down a history buffer of commands, recalling long or complex commands or entries without having to retype. All along, error messages will identify problems with any switch command that may be incorrectly entered. You will see syntax error type messages, incomplete command-type messages, or simply messages that state that the command is unknown.
Other enhanced editing options include commands that allow you to swiftly move around on the command line for corrections and changes. Ctrl A moves you to the beginning of the command line while Ctrl E moves to the end. You can move back and forward words and characters, delete a single character or simply clear the line with Ctrl U. One of the most useful keys is the Tab key which will complete commands as soon as it sees the first few characters on the command.
You can move around back and forth across the history of commands with Ctrl+P and Ctrl+N and also using the up and down arrows. If you want to see all the history that is still available, you can do show history. This is simply a command that you type in EXEC mode and you can extend the history size in terms of the number of lines to remember with that command there.
Viewing the Configuration

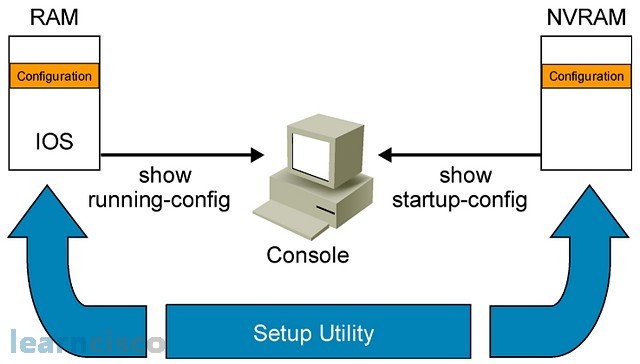
Configuration files are stored live in RAM. This is what you call the running configuration and it is the active config that rules the device at that point in time. There is also the concept of the startup configuration, which is stored in a location called NVRAM or nonvolatile RAM. The startup configuration includes all of the commands that will be available at the next device bootup. You can view each version of the configuration with a show running config to display the running configuration and the show startup config to display the startup configuration. Both versions could be different as saving the running config into the startup config is a manual process. If you do not do it, then the two configuration files will be different and you may lose work in the next bootup.
The show running–config displays obviously the running configuration in RAM, allowing you to monitor and manage that type of configuration file.
DSTR2#show running-config
Building configuration…Current configuration : 1481 bytes
!
version 15.0
The show startup–config displays the contents of the configuration file in NVRAM. Notice that for the show running config, the device will build the configuration from RAM and so that is why you get that little message there, whereas the show startup makes a reference to an existing file already in NVRAM. So it will not have to build the config, as in the case of the show running config, plus it will display the amount of bytes the configuration file is using and the total amount of NVRAM available.
The outputs in this article are taken from the DSTR2 switch in our switching lab.
Our Recommended Premium CCNA Training Resources
These are the best CCNA training resources online:
Click Here to get the Cisco CCNA Gold Bootcamp, the most comprehensive and highest rated CCNA course online with a 4.8 star rating from over 30,000 public reviews. I recommend this as your primary study source to learn all the topics on the exam.

Want to take your practice tests to the next level? AlphaPreps purpose-built Cisco test engine has the largest question bank, adaptive questions, and advanced reporting which tells you exactly when you are ready to pass the real exam. Click here for your free trial.
